

![Airplane [image source: chau nguyen/ http://thedevilhatessweatpants.blogspot.com.au ], crowd ink, crowdink, crowdink.com, crowdink.com.au](https://crowdink.com/wp-content/uploads/2016/08/Chau-airplane-218x150.jpg "5 Reasons You Should Travel Alone")


CrowdInk was lucky enough to be invited to a workshop held by Zoos Victoria at Melbourne Zoo this past Saturday and we walked away with a whole bunch of information that is going to set us up pretty darn well for leading much more sustainable lives at home. This is how you do International Composting Awareness Week the right way.
The behind-the-scenes sustainability workshop was run by Tom Meek, Sustainability Manager at Melbourne Zoo. The tour started with a meet up at the main roundabout at the zoo, just past the main entrance and marked by a golden elephant statue.
We were introduced to everyone participating in the tour and then given a basic breakdown of a few of the sustainability initiatives that the zoo is already putting into place. Bins around the zoo are marked by color: red bins are bound for landfill, green bins are all for organics and go into their on-site hot composting systems, and yellow bins are co-mingled recycling. One of the biggest initiatives put into place by Melbourne Zoo is to reach zero waste by 2018-2019. They are well on their way.
“It’s easy to think of bins as just a hole that takes our waste into the abyss. The truth is that bins are containers. Our waste doesn’t disappear. It goes somewhere.” – Tom Meek
After a basic breakdown of how composting at the zoo is handled, the group was given a tour of the composting system already in place at Melbourne Zoo. There is a massive hot composting machine produced by HotRot in New Zealand that is motor-driven and serves to homogenize all material quickly (it only takes 10-14 days to oxygenize and turn waste material into really gorgeous compost). The zoo then bags the finished product into Zoo Gro, which is available from local independent nurseries, or in bulk from Bulleen Art and Garden for home use on top of gardens and veggie patches.
Next, Tom took the group through a basic “How To” of creating a composting system at home. He even brought in a worm farm that he’d had for 21 years.
There are three basic composting systems that are pretty practical for home use: bokashi bins, cold composting, and worm farming (vermiculture).
Bokashi Bins
Bokashi bins are optimal for living situations that don’t leave a bunch of outdoor space for cold composting or a worm farm. All you need is:
- Bokashi Bin (these can be purchased in nurseries and, in Australia, many Councils offer discounts)
- Bokashi Spray or Bokashi Grain (which is a powder)
- Food Scraps
To use a bokashi bin, simply choose a cool location out of direct sunlight (underneath the sink in the kitchen or in a pantry is great. These are odourless, so indoors is perfect.) Cut food scraps into small chunks and place them in the bokashi bin in layers up to 15mm thick. Spray the food 4 or 5 times with bokashi spray or dust with bokashi grain. Repeat until the bin is full and squash down the waste as much as possible. The idea is to remove as much air as possible.
As the food scraps break down, they produce a liquid that can be harvested from the tap. Dilute this liquid (bokashi juice) with water (10 water: 1 bokashi juice) and water your plants. They’ll love it. The compost itself can be harvested every 3-6 months.
Worm Farms (Vermiculture)
Worm farms minimise food waste by turning organic kitchen waste into nutrient-rich fertiliser which can be used for plants and soils. The structures are available in most nurseries or are easily enough to build out of bins. They contain at least 3 levels with a tap on the lowest level:
Upper level(s) – Where worms eat. After worms have filled the mid-level with castings, they’ll move up a level.
Middle level – This is where worms rest, digest, lay eggs, and poo. This is where your worms begin until they can climb the ranks.
Bottom level – This is where worm wee gathers (DO NOT ADD FOOD HERE).
To Start Your Worm Farm
You’ll need 500 or 1000 compost worms to start (these run between $30-60 for the bunch), along with newspaper, an old t-shirt, food scraps, and the worm farm structure.
Place the lower and middle levels of the worm farm in a sheltered area out of the sun outside. Line the base of the middle level with newspaper. Soak the bedding block provided with your worm farm for 30 minutes before spreading it over the newspaper. Add worms to the middle level and cover them with sheets of damp newspaper or an old t-shirt. Replace the lid.
Let the worms chill out for a few days and then gradually add small amounts of food. Avoid giving worms whole fruit or vegetable. Cut everything up. As worms start breeding, the food will disappear faster.
Once the middle level is full to the brim of castings, add some more levels. The worms will find their way. Harvest worm wee and dilute to water plants (the same way you would harvest bokashi juice). Castings can be harvested about every 6 months.
Cold Composting
Composting is the process of recycling organic materials into a rich soil known as compost. Food scraps and garden waste is biodegraded and turned into an organic fertilizer which can be used on garden beds.
To Start Your Compost
You’ll need a compost bin, container to collect food scraps, food scraps, green waste (grass & foliage), and water.
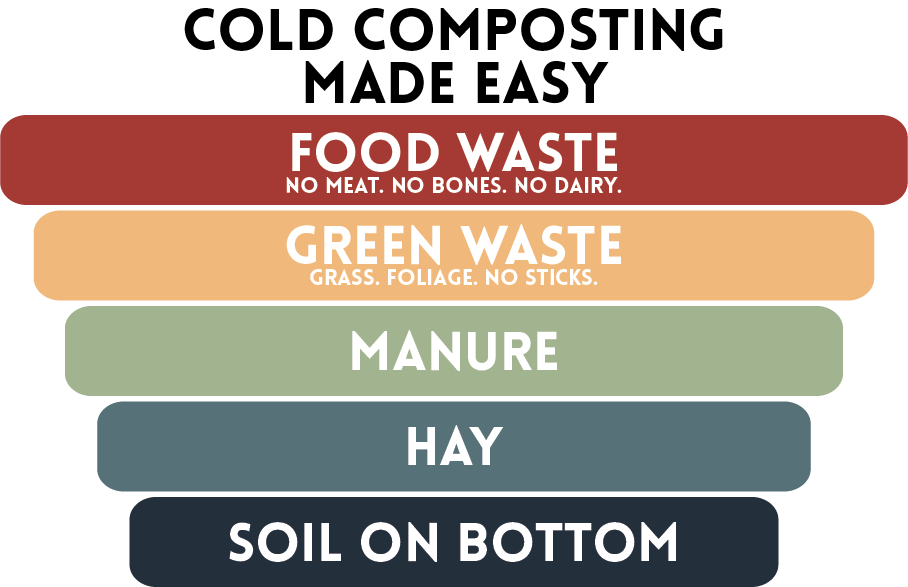
Choose an outdoor location where your compost bin will be on bare earth with good drainage. Add a layer of soil, then a layer of hay, then manure, then your green waste, and finally your food waste. When refilling with food scraps, don’t forget to add more green waste as well. Maintain moisture by adding water to the bin as necessary. It’s important that the cold compost is aerated, so stir the contents of your compost bin often.
Once the compost looks like dark, rich soil (3-6 months), harvest and spread around plants. Check out the graphic below for a clearer idea of how to build an optimal cold compost bin.
Here is a snapshot of our day:
Have you ever composted or farmed some worms? How did it work out? Let us know in the comments below!


 – A Real Life Story")
